Most of us will know that performing multiple upload with JavaScript alone that are both dynamic and powerful is complicated and confusing. Let alone having cross browser capability. Furthermore, all browsers will only allow one file to be chosen per dialog box at any one time. This makes multiple upload a tedious job for our users. Moreover, most methods are having a hard time populating the bytes uploaded to the system (progress bar). Therefore, there is a need for a more powerful and easier solution for multiple uploader that can both upload asynchronously and allows users to select multiple files at one go.
Solution
We can use JavaScript, iFrame and PHP library to perform the above task. However, this is more complicated and required to configure the server so that it contains the PHP library. If you are working on Open Source application, requesting users to configure their PHP server in order to use a certain function is not desirable. However, this can be done as follow
- Using JavaScript to eliminate the need for multiple upload file
- Using iFrame to store each upload bar to be prepared to upload
- PHP itself is capable to receive multiple files
- However, PHP is unable to show the process bar of each upload. This will required < a href="http://pecl.php.net/package/APC" rel="nofollow">Perl library(php_apc.dll) that was built for PHP which is currently unavailable in PHP 5.2 but will be placed into PHP in version 6. (that's is why i didn't write this tutorial)
I personally did the above 2 years ago when i was still working for an Australia based company (which i might write it out in this site later). The other method is to use a flash uploader such as SWFUpload.
What is SWFUpload?
SWFUpload is an open source flash uploader that WordPress is currently using. Although this is not a normal plug and play flash uploader, it is certainly updated and powerful. Moreover, it has cross browser capability and allow users to select multiple files at one time. However, implementing it and understanding it do takes time. But it worth it.
Let's get started
I did this on one of my WordPress plugin. But getting it to work really waste a lot of my time. Therefore, i decided to write them up for some of you out there who are just getting started with this. Enough of chit-chat. Let's get started. The fastest and easiest way is to download their sample files. The sample files will have most of the things you need. The sample files are similar to their demo page. This means that the sample files are the exact same thing as the demo given. Let's just start with the simplest first. Look at Simple Upload Demo and this is what we want to achieve at the end of this article. What you need are the following files in the simpledemo folder that you have downloaded to your local drive.
- index.php
- all files in js folder
- all files in css folder
- all files in swfupload folder located outside of simpledemo folder
Just in case you don't get it, here's a screenshot.
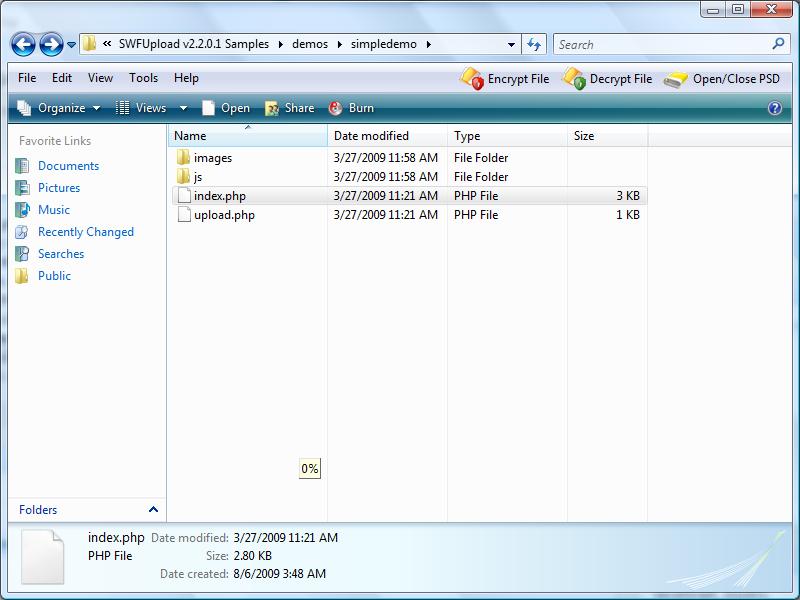
basically you will only need partial code from index.php which you can figure out them very quickly. The files that you would actually edit are the codes in index.php and handler.js only.
Important Part
Basically, if you throw the sampledemo into your server it should display exactly the same as what you see on their demo page. However, i do not think you want it to be exactly the same. You can try to read the documentation which is quite helpful in some way and in many way it does not. Unlike normal upload, SWFUpload work a little bit different which you will need to know(or suffer).
- SWFUpload do not use MIME type, so don't try to validate whether it is image in PHP. This is a flash uploader!
- SWFUpload will required the initialization of the object to work. Invalid of initialization will cause you a headache in just displaying the upload button (quite easy just don't be careless)
- You need to ensure that your PHP files on the server side is working correctly before using SWFUpload. This means that you must check whether it is uploading correctly using normal file uploader
- The above part will help u a bit in reducing debugging problem later. The other problem you might face greatly is debugging issues. How do we debug when we are using flash uploader? You will have to look up at the handler.js file with the method 'uploadSuccess' that will return you with the serverData. This 'serverData' variable contains what is happening on your server side. This is the only thing that can assist you in debugging
- you can write methods to overwrite the handler default in the swfuploader.js by using the handler.js. No modification is needed in swfuploader.js.
The list can just go on, if you face any problem you can just send me an email. For the important initialization part,
		var swfu;

		window.onload = function() {
			var settings = {
				flash_url : "../swfupload/swfupload.swf",//the path of swfupload.swf.eg. http://hungred.com/swfupload.swf
				upload_url: "upload.php",//the path of your upload php file. eg. http://hungred.com/upload.php
				post_params: {"PHPSESSID" : "<?php echo session_id(); ?>"}, // this is additional information for your upload.php file. eg. in upload.php 'echo $_POST['PHPSESSID'];'
				file_size_limit : "100 MB", //the limit impose for your flash uploader which is different from the one in your upload.php (additional validation)
				file_types : "*.*", // allowed file type. eg. '*gif*png*jpg';
				file_types_description : "All Files", //the name of the dialog box
				file_upload_limit : 100,//the number of upload allowed. eg. max is 100
				file_queue_limit : 0,// the maximum amount of queue upload allowed. eg. 0= unlimited
				custom_settings : {
					progressTarget : "fsUploadProgress",
					cancelButtonId : "btnCancel"
				},
				debug: false,//debugging mode that display all the information of the flash uploader. You can customize them in handler.js

				// Button settings
				button_image_url: "images/TestImageNoText_65x29.png",//button image populated by the flash uploader
				button_width: "65", //width of the button
				button_height: "29",//height of the button
				button_placeholder_id: "spanButtonPlaceHolder", //the id container of the button. eg. <div id="spanButtonPlaceHolder"></div>
				button_text: '<span class="theFont">Hello</span>',//the text in the button
				button_text_style: ".theFont { font-size: 16; }",//the style of the text
				button_text_left_padding: 12,//left padding
				button_text_top_padding: 3,//top padding

				// The event handler functions are defined in handlers.js
				file_queued_handler : fileQueued,
				file_queue_error_handler : fileQueueError,
				file_dialog_complete_handler : fileDialogComplete,
				upload_start_handler : uploadStart,
				upload_progress_handler : uploadProgress,
				upload_error_handler : uploadError,
				upload_success_handler : uploadSuccess,
				upload_complete_handler : uploadComplete,
				queue_complete_handler : queueComplete	// Queue plugin event
			};

			swfu = new SWFUpload(settings);
	     };
The code above are so long but there are no comment on it when you look at the demo files provided. I have comment above to explain what it does since it is criteria important you understand them during your development. Handler do not have comment as those are methods exist in handler.js which means you can change how it should be handler. Lastly, you can edit the display by changing their css file, default.css. If you need additional example, please look into your WordPress swfupload folder located in the wp-include folder.
The Demo
I can't really provide with you with the exact same demo given by SWFUpload. You can see the more advance part on WordPress, 'Add new' post section. Or you can view the screen shot that i did with my plugin below.

The Summary
The reason for this article is to make aware some of the points in SWFUpload flash uploader. Although it is powerful, the community for such application is still quite small which might bring some difficulty for some of the people out there who are starting to use this application. Why this and not other alternative uploader? Updated, maintained, acknowledged, no additional configuration required, multiple selection, cross browser, small size, etc. the list can goes on. Enjoy!


