


Introduction
jQuery is one of the many framework provided online to help developers to minimize the time needed to write advance coding. It provides many useful feature to help developers to overcome cross browser issues. Best of all, it is extremely light-weight for optimization! jQuery has a large community and available plugin for different purposes. What jQuery can do for you? Powerful stuff! Check out their plugin made by other developers all over the world!
Since i am also new to jQuery, i believe there will always be new comer entering new technology and feature. So here i am writing this article to introduce some of the basic i learn in jQuery and hope it will help others too. Please bear in mind before we start, jQuery selection will always return you a set of jQuery object which you can use to do a chain operation(chaining is the powerful part of jQuery).
Element Manipulation
Let's start with jQuery element manipulation. For starters, jQuery is written in the following two ways,
$(selector)
or
$jQuery(selector)
This is the basic thing a jQuery programmer will need to know when dealing with jQuery. This is more like a declaration for jQuery. The '$' symbol and jQuery is the namespace used in jQuery. With just this knowledge, you can do a lot of things in jQuery. Below listed different way of manipulating the element in jQuery.
$("p a")
retrieve the group of links nested inside a
element
$("div.notLongForThisWorld").fadeOut();
fade out all
$("div.notLongForThisWorld").fadeOut().addClass("removed");
add a new CSS class, removed, to each of the elements in addition to fading them out. The fadeOut() is a function in jQuery that will fade the element out of the screen while addClass(css class name) adds a new class to the element.
$("#someElement").html("I have added some text to an element");
or
$("#someElement")[0].innerHTML ="I have added some text to an element");
add the text 'I have added some text to an element' to the element which hold the id 'someElement'. The first adds to all elements that contain this id the second only place the text into the first element it sees. The .html('') is similar to innerHTML.
$("p:even");
This selector selects all even
elements. even is one of the Filter in jQuery
$("tr:nth-child(1)");
This selector selects the first row of each table.nth-child(index/even/odd/equation) is one of jQuery Child Filter.
$("body > div");
This selector selects direct
$("a[href$=pdf]");
This selector selects all links to PDF files. the [attribute$=value] is one of jQuery Attribute Filter
$("body > div:has(a)")
This selector selects direct
$('img[alt],img[title]')
match all elements that have either an alt or a title attribute.
if you haven't notice, the syntax used in the string are mostly used in CSS too which is used to select the specify element to apply the style on. This is also being used in jQuery during selection. jQuery has its own advance selection too which are the filters and hierarchy example shown above. jQuery uses some form of regular expression to perform its selection but the author had made it very abstract for the developers(great!). You guys can visit http://docs.jquery.com/Selectors for more selector manipulation functions and example.
Utility Functions
jQuery itself has many other Utility functions that can be used by developers. An example to use a function 'Trim' is as follow,
$.trim(" testing ")
the above will provide a trimmed version of 'testing' without spaces in between the word. It can also be
jQuery.trim(" testing ")
There are many other function that can be found in http://docs.jquery.com/Utilities which is useful when dealing with application.
Document Ready Handler
Traditionally we have the onload method given in javascript. However, the onload event handler is evil because it not only wait for the DOM tree to be fully created, it also waited for all other element in the page to finish loaded. This means that only when the page has fully loaded, will the function in the onload event handler starts activating. Most of the time the user will long be gone before your page has loaded(images loaded last and longest). Speed is everything nowadays.
jQuery provided a event handler called 'ready' which is very handle. It is not only cross browser compatibility, it also eliminate the 'problem' caused by onload function. The ready event handler will load once the DOM tree has fully loaded. This way, both the images and functions of javascript can be proceed. This promote synchronisation. Furthermore, the jQuery ready event handler is able to be nested in the script unlike onload handler which only allow a single function.
Example,
$(document).ready(function() {$("table tr:nth-child(even)").addClass("even");});
This is a formal syntax when calling .ready event handler.
$(function() {$("table tr:nth-child(even)").addClass("even");});
While this is an shorthand form. (By passing a function to $())
Making DOM Element
Making DOM element for cross browser is never an easy task. Most programmers will face issues when dealing with IE in making DOM element. jQuery helps to eliminate all these problem by simplifying it.
Example,
$("<p>Just like this</p>")
To create a DOM element in jQuery is as simple as writing a tag in HTML!
Extending jQuery
Wish to extend the Capability of jQuery? You can, by writing the following code.
$.fn.disable = function() { return this.each(function() { if (typeof this.disabled != "undefined") this.disabled = true; });}
The above code tells jQuery that we are defining a new method 'disabled' by extending the $ wrapper by using the sentence '$.fn'.
Conclusion
From the above we can see how powerful jQuery is. Learning more about it and working with this existing library will help alot in the future! Especially when it comes to cross browser and file size, jQuery is one of the best among the framework available. Furthermore, there is a very large community for this framework that can assist your growth in jQuery. Of course, there are alternative such as MooTool that also provided the same competitive advantages similar to jQuery.Unfortunately, I have not a chance to experience MooTool yet. Hopefully i will in the future! The above example mostly has been taken in the book 'jQuery in Action' by Bear Bibeault and Yehuda Katz. Great book for people who has a understanding on DOM, CSS and javascript.
Tutorial: Basic Horizontal Type Tools Function
Here are some of the way you can work with Horizontal Type Tools.
If you wish to split the character after you have finish typing, you can do this by right click your text layer and select 'Convert to Shape'. Once it has been converted, you can use 'Path Selection Tool' or 'Direct Selection tool' to move and manipulate your text.


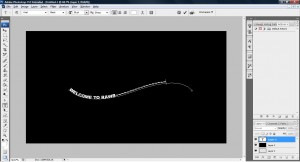
Well..If you would like your text to follow a path you can select your pen tools and draw the path. Next, use the Horizontal Type Tool and lookout for the symbol 'I' when your mouse go near the starting path drawn by your pen tools. Once you get it, click on it and start typing your text.

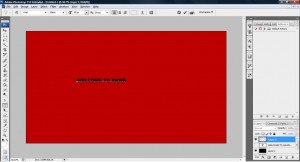
If you would like to extract the background of your written text, you can do this by using the Horizontal Type Mask Tool. Use that and type your text on the image you wish the text to have(Make sure the layer you used this tools have the background on it). Since our selection is still there, we have to reverse it, so we go to select->inverse and duplicate the layer. Finally, we click delete button on our keyboard to delete away all other text other than the text itself.


If you would like your text to contain shape you can do click ont he icon 'Create Wraped Text' and it will give you a list of function you can do to wrap your text nicely.

Other than the one mention above, you can style your text such as changing size,font etc. etc. It's all up to you~
Tutorial: How to add effects with brushes!
Being a novice in photoshop i would say this is the greatest finding i have since i started playing with photoshop! I never know that there is such a powerful tool that most designer have been using to enchance their image and design! I would like to share this awesome technique to you guys and hope you guys find this interesting too~
This technique has something to do with the 'Brush Tool'. We can actually add some of the ready made brushes to enhance the effects of our design. ( of course, some brushes are not for commercial) It's REALLY simple to create a design with all these ready made brushes! Let me give you a demonstration.
1. Visit this site and download the brushes you see.(There are a lot of them. Check them out!)

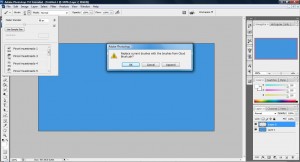
2. If you have no idea how to install the brushes, click here or visit the link shown on the above image. Once you have installed the brushes, fire up your photoshop and create a background in blue.
3. Select your new brush (Usually its the same name as the file you place in your brush folder) and It will prompt you to overwrite the existing brush. Click HELL YEAH!
4. Once you have updated your brush, select one of it from the list and click on the workspace. Please bear in mind that your color must be different from the background color used.

AWESOME! XD
This can also be applied on pattern when you want to make a great design for your background or button. But you will need to install it on the pattern folder and not the brushes folder. This technique also can be applied on different button and text which enchance the effects of your overall design.
Some basic on Javascript that not all programmers are aware
These are some of the JavaScript way of writing that one usually do not know by learning on some basic web site such as w3schoo.com
Declaring many variables at once
You can declare many variable at once by doing the following,
var test,test1,test2,test3,test4
OR
var test=1,test1=2,test2=3,test3=4,test4=5
Assignment operator shortcuts
you can do a assignment operator in short instead of writing long code.
x+3=x -> 1+=3
x-4=-x -> x-=4
x*1=x -> x*= 1
x/1=x -> x/=1
x+1=x -> x++
x-1=x -> x--
The "with" statement
The 'with' statement basically help you reduce some code. The meaning of with can be read as 'with this'. For example,
<script type="text/javascript">
document.write('Hi there, how are you?")
document.write('Fine, thanks. And you?')
document.write('Great!')
</script>
You can write as
<script type="text/javascript">
with(document)
{
write('Hi there, how are you?")
write('Fine, thanks. And you?')
write('Great!')
}
</script>
By using the 'with' statement, everything that falls inside of its brackets ({ }) default to the object specified in it's parameter. That way, you only need to type the object name once.
Remember, the "with" statement can be used with any JavaScript object to avoid having to repeatedly write the object out when referencing it multiple times.
The "?" conditional expression statement
This is a shortcut for if-else statement and it will return a Boolean value. For example, instead of writing this
if(x==1)
do something..
else
don't do it..
We can write something shorter such as this,
x==1 ? do something.. : don't do it..
The format for this is as follow,
(condition) ? doiftrue : doiffalse
Conclusion
The reason for doing all these shortcut is to improve efficiency of the code to help improve performances. Especially on large application where efficiency holds a key to whether its a good or bad application. Every line of code contribute greatly on the performance of the application. One will have to remember that speed in web application holds a key on whether anyone will visit or use your application/site.
Tutorial: How does image fade in when picture loaded in JavaScript
There is a very nice method mention in here by Richard Rutter. But i will explain it with my own words on how this is being done since i am curious on how some of these things work. i basically look it up and explain them so that i could understand them in the future if needed.
<html>
<head>

<style>
#photoholder {
  width:450px;
  height:338px;
  background:#fff url('loading.gif') 50% 50% no-repeat;
}
#thephoto {
  width:450px;
  height:338px;
}
</style>
<script>

document.write("<style type='text/css'> #thephoto {visibility:hidden;} </style>");
window.onload = function() {initImage()}
function initImage() {
  imageId = 'thephoto';
  image = document.getElementById(imageId);
  setOpacity(image, 0);
  image.style.visibility = 'visible';
  fadeIn(imageId,0);
}
function setOpacity(obj, opacity) {
  opacity = (opacity == 100)?99.999:opacity;

  // IE/Win
  obj.style.filter = "alpha(opacity:"+opacity+")";

  // Safari<1.2, Konqueror
  obj.style.KHTMLOpacity = opacity/100;

  // Older Mozilla and Firefox
  obj.style.MozOpacity = opacity/100;

  // Safari 1.2, newer Firefox and Mozilla, CSS3
  obj.style.opacity = opacity/100;
}
function fadeIn(objId,opacity) {
  if (document.getElementById) {
    obj = document.getElementById(objId);
    if (opacity <= 100) {
      setOpacity(obj, opacity);
      opacity += 10;
      window.setTimeout("fadeIn('"+objId+"',"+opacity+")", 100);
    }
  }
}

</script>
</head>

<body>
<div id='photoholder'>
<img src='cute-puppy.jpg' alt='Photo' id='thephoto' />
</div>
</body>
</html>
the code above is the whole HTML file that is needed for this explanation. I did not change anything written by Richard Rutter and merely just compile it up for my explanation.
So what is going on with the above code is that Richard has written a very unique function for each activity occurs in this example. There are basically 3 method, initImage(), setOpacity, fadeIn. The css in here doesn't really play any important round other than displaying the image up. The initImage method set the oject opacity and activate fadeIn method that did a recursive to slowly fade the image. The technique to Richard way of doing is to load the 'loading' image out to the guys and only started fading the image once it has been loaded by using the onload function to determine whether the page has completely loaded. Once it is determine, it will active the fade in method to do the trick.
The main interest i have is how fade in effect works and with the code written by Richard, it is clearly understandable how this is happening.
You can look at the example HERE.