WordPress Plugin Development Tips And Tricks

I have been developing WordPress plugin for a while now and it seems like there are always some correct and better ways of writing a particular code in WordPress than mindlessly trying to substitute it with pure PHP. However, these WordPress codes can only be found through countless reading and analyzing of codes from other WordPress sources. In this article, i will present as many tips and tricks i have seen in WordPress that can be very useful for wordpress plugin development.

Find Plugin Directory and URL With WordPress

Previously, i used to hard code the directory by using PHP function. However, after realize there is a better alternative in WordPress, i changed the way i find the plugin directory and URL.

In PHP,

$url = get_bloginfo('url')."/wp-content/plugins/plugin-name/images/hello.jpg";
$directory = dirname(__FILE__)."/plugin-name/images/hello.jpg";

Note: Using dirname(__FILE__) might not always end up on the plugin folder.

In WordPress,

$url = WP_PLUGIN_URL."/plugin-name/images/hello.jpg";
$directory = WP_PLUGIN_DIR."/plugin-name/images/hello.jpg";

Import CSS or JavaScript in WordPress

We love to code these import statement out to the function that performed the action. It can be on the admin page, write post page, home page, etc. But the correct way is to use WordPress action hook and built-in method.

Import CSS/JavaScript to Admin page

function hpt_loadcss()
{
	wp_enqueue_style('hpt_ini', WP_PLUGIN_URL.'/hungred-post-thumbnail/css/hpt_ini.css');
}
function hpt_loadjs()
{
	wp_enqueue_script('jquery');
	wp_enqueue_script('hpt_ini', WP_PLUGIN_URL.'/hungred-post-thumbnail/js/hpt_ini.js');
}
add_action('admin_print_scripts', 'hpt_loadjs');
add_action('admin_print_styles', 'hpt_loadcss');

Import to theme page

function ham_add_style()
{
	$style = WP_PLUGIN_URL . '/hungred-ads-manager/css/ham_template.css';
	$location = WP_PLUGIN_DIR . '/hungred-ads-manager/css/ham_template.css';
	if ( file_exists($location) ) {
		wp_register_style('template', $style);
		wp_enqueue_style( 'template');
	}
}
add_action('wp_print_styles', 'ham_add_style');

Both ways utilize the wp_enqueue_style/wp_enqeue_script method and action hook to import stylesheet and JavaScript properly into WordPress.

Separate Plugin Admin Code

This is only necessary if you are building a large plugin for WordPress. It is efficient to separate the admin codes from others by placing it on an external file so that the admin codes will not be complied by PHP when non-admin user or visitors are accessing your website.

if (is_admin())
include(‘admin.php’);

Secure your WordPress Query

Security something important for all of us. WordPress has a function escape() in their global variable $wpdb. It is best to use this for all data query in your WordPress to better secure your SQL query with the database to prevent any form of security attack. below shows an example,

 $welcome_name = "Mr. WordPress";
  $welcome_text = "Congratulations, you just completed the installation!";

  $insert = "INSERT INTO " . $table_name .
            " (time, name, text) " .
            "VALUES ('" . time() . "','" . $wpdb->escape($welcome_name) . "','" . $wpdb->escape($welcome_text) . "')";

  $results = $wpdb->query( $insert );

You may want to visit the presentation slide that have some interesting WordPress function used for securitySecure Coding with WordPress – WordCamp SF 2008 Slides

Use WordPress For Table Prefix

Never hard code your table prefix in WordPress! WordPress provides a variable in its global variable $wpdb that allows you to easily retrieve your table prefix.

global $wpdb;
$table_name = $wpdb->prefix . "liveshoutbox";

Get Absolute Path In WordPress

In WordPress, you can get the absolute path through the constant ABSPATH which is defined in WordPress.

require_once( ABSPATH . '/wp-includes/classes.php' );
require_once( ABSPATH . '/wp-includes/functions.php' );
require_once( ABSPATH . '/wp-includes/plugin.php' );

Determine Whether a Table Exist In WordPress

Wonder how to determine whether a table exist in your WordPress? You can use the following method to detect whether a particular table exist.

global $wpdb;
$table_name = $wpdb->prefix . "mytable";
if($wpdb->get_var("show tables like '$table_name'") == $table_name) {
	echo 'table exist!';
}

Always Record Table Version

This is an important tips. Always remember to record the version of your plugin table, so you can use that information later if you need to update the table structure. This can help in upgrading your table structure of the plugin in the future.

add_option("hungred_db_version", "1.0");

Create Table Using WordPress Method

This is important for many WordPress developers out there. Although we can create a table using the following method,

	$table = $wpdb->prefix."ham_form";
    $structure = "CREATE TABLE  `".$table."` (
		ham_id DOUBLE NOT NULL DEFAULT 1,
		ham_textarea longtext NOT NULL,
		ham_display longtext NOT NULL,
		UNIQUE KEY id (ham_id)
    );";
    $wpdb->query($structure);

Great! A table is created! Now, tell me how are you going to change this structure in the future? A better alternative is to use the function dbDelta in WordPress.

	$table = $wpdb->prefix."ham_form";
    $structure = "CREATE TABLE  `".$table."` (
		ham_id DOUBLE NOT NULL DEFAULT 1,
		ham_textarea longtext NOT NULL,
		ham_display longtext NOT NULL,
		UNIQUE KEY id (ham_id)
    );";
	require_once(ABSPATH . 'wp-admin/includes/upgrade.php');
	dbDelta($structure);

Directly from WordPress,

The dbDelta function examines the current table structure, compares it to the desired table structure, and either adds or modifies the table as necessary, so it can be very handy for updates (see wp-admin/upgrade-schema.php for more examples of how to use dbDelta). Note that the dbDelta function is rather picky, however. For instance:

* You have to put each field on its own line in your SQL statement.
* You have to have two spaces between the words PRIMARY KEY and the definition of your primary key.
* You must use the key word KEY rather than its synonym INDEX

Hence, any update on the structure of the table will result in a change on the user plugin as well.

Use Nonces During Form Submission

Nonces are used as a security related protection to prevent attacks and mistakes. You can use Nonces to enhance your WordPress form. here is an example,

<form ...>
<?php
if ( function_exists('wp_nonce_field') )
	wp_nonce_field('hungred-post-form'+$uniqueobj);
?>
</form>

We are just using the method wp_nonce_field in WordPress to create a nonce field on the above example. Next, we will need to validate whether the nonce is valid by using the following method after the user have submitted the form. This should be placed before any action began.

<?php check_admin_referer('hungred-post-form'+$uniqueobj); ?>

Pretty easy for enhancing form in your WordPress plugin. But this is not all you can do. There is also Link nonce protection where link is attached with a Nonces. You can read more about Nonces from the below link.

They have better explanation and example to understand Nonce.

Speed up your WordPress plugin development with Ubiquity Firefox add-on

ubiquity

Ubiquity is a Mozilla Firefox add-on, developed by Mozilla Labs. It allows you to search WordPress and PHP (PHP) documentation in an instant. Safe time on Google, more time on development 😀

The Predefined Prototype Object In JavaScript

Most of us learn JavaScript from tutorial website such as w3schools or tizag.com. However, these tutorial site only covered the most fundamental of JavaScript. Many hidden features of JavaScript are usual removed to simplify the tutorial. Although basic does bring us a long way, we still need to read more of these features eventually and improve our coding. In this article, i will cover the predefined prototype object in JavaScript. We will discuss everything we need to know about prototype object and the application in the real world.

The Prototype Object

The prototype object was introduced on JavaScript 1.1 onwards to simplify the process of adding or extending custom properties and methods to ALL instances of an object. In other word, prototype object is used to add or extend object properties or methods so every other object will also have such properties/methods. Let me show you an example. Below listed a few way to extend an object properties.

//adding a custom property to a prebuilt object
var imgObj =new Image();
imgObj.defaultHeight= "150px";

//adding a custom property to the custom object "Shape"
function Shape(){
}
var rectangle =new Shape()
rectangle.defaultColor = 'blue';

From the above example, we are able to extend properties of each object easily. However, if i create a new instances of the same object, the properties will be lost!

var newImg =new Image();
alert(newImg.defaultHeight); //return undefined 'defaultHeight';

var newRec =new Shape()
alert(newRec.defaultColor); //return undefined 'defaultColor';

This is when prototype object comes in. Prototype object is able to add the properties above and extend to other new instances object as well. Hence, the following will allowed all new instances created to contain the properties or methods attached by any previous object. We just have to add the keyword prototype between the object and name of the properties/method to use the prototype object. Using the same example above,

//adding a custom property to a prebuilt object
function check_height(){
 return typeof this.defaultHeight != 'undefined'?true:false;
}
var imgObj =new Image();
imgObj.prototype.defaultHeight= "150px";
imgObj.prototype.hasHeight= check_height;

//adding a custom property to the custom object "Shape"
function Shape(){
}
function color_checker(){
 return typeof this.defaultColor != 'undefined'?true:false;
}
var rectangle =new Shape()
rectangle.prototype.defaultColor = 'blue';
rectangle.prototype.hasColor = color_checker;

var newShape =new Shape()
alert(newShape.defaultColor) // blue
alert(newShape.hasHeight) // true

var newImg =new Image()
alert(newImg.defaultHeight) // 150px
alert(newImg.hasColor()) // true

Now every new instances of Image and Shape will have the properties and methods defined previously by the variables rectangle and imgObj.

Prototype Object Restriction

Prototype object can add or extend properties or methods to any custom object but for predefined object, only those that are created with the new keyword are allowed to use the prototype object in JavaScript. The following list some of these predefined object.

  • The date object
  • The string object
  • The Array object
  • The image object

Prototype Object is an Array

In case you haven't notice, prototype object is actually an array. From all of the above example, we are doing the following declaration to create new properties or method

//declare a function
obj.prototype.name = function(){};
//declare a property
obj.prototype.name = variables;

Notice that we are actually associating a name with a variable or function into the prototype object. Hence, we can also declare prototype with the same way as declaring an array.

obj.prototype ={
name: variables,
name: function(){}
}

The above two methods are similar and can be declare either way. Since both ways are similar, performance wise shouldn't make any big differences.

Priority Between Prototype And Own Property

What if we have both property? If the object itself already has a prototype property and if we redeclare the exact same property again without the keyword prototype, JavaScript will take which property? The answer is own property. In JavaScript, the own property takes precedence over the prototype's. Consider the following example,

function Rectangle(w,h){
	this.area = w*h;
}
var obj = new Rectangle(2,2); //area is 4;
obj.prototype.area = 200; // now we have own and prototype 'area'
alert(obj.area); // 4 will appear instead of 200; Hence, own property takes priority first.

What happened if we delete the property?

delete obj.area
alert(obj.area); // 200 appeared! 

Prototype property will take over again. Hence, we can use the Own property to overwrite prototype property defined in the object.

Identify Own and Prototype Properties

How do we identify whether the given object properties are from own or prototype? In JavaScript, there is a method hasOwnProperty which can be used to identify whether a given property is from own or prototype. Let's look at the following example,

function Rectangle(w,h){
	this.area = w*h;
	this.parameter = w+h;
}
obj.prototype.height = 5; 
obj.prototype.weight = 6; 

var obj = new Rectangle(2,2); 
obj.hasOwnProperty('area');// return true;
obj.hasOwnProperty('parameter');// return true;
obj.hasOwnProperty('height');// return false;
obj.hasOwnProperty('weight');// return false;

Inheritance Using Prototype Object

In the real world, prototype object is usually used as inheritance during OOP (Object Oriented Principle) with JavaScript. In JavaScript, we are not looking at classes inheriting other classes but object inheriting other object since everything in JavaScript is Object. Once we understand this, it will be easier for us to show inheritance example with prototype object.

function Shape(){
}
function color_checker(){
 return typeof this.defaultColor != 'undefined'?true:false;
}
function getArea(){
return this.area;
}

Shape.prototype.defaultColor = 'blue';
Shape.prototype.hasColor = color_checker;
Shape.prototype.getArea = getArea;

function Rectangle(w,h)
{
	this.area = w*h;
}

function Rectangle_getArea()
{
    alert( 'Rectangle area is = '+this.area );
}
Rectangle.prototype = new Shape();
Rectangle.prototype.constructor = Rectangle;
Rectangle.prototype.getArea  = Rectangle_getArea; 

Using the custom object 'Shape' example above, i extend it so that 'Rectangle' will inherit all method and properties of 'Shape'. Inherit can be done through this sentence

Rectangle.prototype = new Shape();

'Rectangle' prototypes are assigned to the prototype of the 'Shape' through an object instance thereby "inheriting" the methods assigned to the prototype array of 'Shape'. After 'Rectangle' has inherit 'Shape', it overwrites the getArea method of 'Shape' through this statement.

Rectangle.prototype. getArea  = Rectangle_getArea; 

Inheritance using prototype object can reduce a lot of unnecessary coding and make your overall code run faster. The constructor on the above code is to overwrite the way Rectangle object is being instantaneous since the Rectangle prototype was overwritten by Shape prototype on the previous statement. Hence, to create a Rectangle object, the constructor for it will be as follow

function Rectangle(w,h)

We can use the above code as follow

var recObj = new Rectangle(20, 20);
rec.getArea(); //return 'Rectangle area is = 400'
rec.hasColor(); // return true;
rec.defaultColor;//return blue;

Check Prototype Inheritance

We can check whether a particular object is another prototype object by using the function isPrototypeOf. In other word, we can check whether a particular object inherit another object properties and methods. Using the previous inheritance explanation, we can check whether Shape is inherited into Rectangle object.

var rec = new Rectangle(5,5);
Shape.isPrototypeOf(rec);// return true;

This shows that Shape is a prototype of rec object. I think the method name said it all.

Tutorial: How to check whether a particular field exist on SQL table

I was doing some plugin enhancement when i needed to find out whether a field exist on the SQL table. Hence, i went Google and search for a good answer. I found two method to solve this problem but i prefer the one using pure SQL query. Hence, i decide to write them down for future use and also make it as a discussion regarding the pros and cons.

PHP Solution

The first solution i found was a method that used PHP and perform a calculation in order to conclude whether the field exist on the SQL table. Here's the snippets:

$fields = mysql_list_fields("databasename", "tablename");
$columns = mysql_num_fields($fields);
for ($i = 0; $i < $columns; $i++) {
    $field_array[] = mysql_field_name($fields, $i);
}
       
if (!in_array(‘list_id’, $field_array)) {
    mysql_query("ALTER TABLE `tablename` ADD `fieldname` INT(11) NOT NULL DEFAULT ‘1′;");
}

From the above snippet provided by Antonie Potgieter, the concept is good but it is still not optimum. A better alternative can be written as follow.

$result = mysql_query("SELECT COLUMN_NAME FROM INFORMATION_SCHEMA.Columns WHERE TABLE_NAME ='tablename'");
$field_array = mysql_fetch_array($result);      
if (!in_array(‘list_id’, $field_array)) {
    mysql_query("ALTER TABLE `tablename` ADD `fieldname` INT(11) NOT NULL DEFAULT ‘1′;");
}

The code above have not been tested but the query, yes. Nonetheless, a loop can be removed anyhow by retrieving the set of array resist within the return value of mysql_fetch_array. The objective is to avoid loop and shorten the code as much as possible.

SQL Solution

I found a better alternative on DZone! I find that it is a much effective way to check the existence of a field. Here's the snippets:

IF NOT EXISTS (SELECT * FROM INFORMATION_SCHEMA.COLUMNS
WHERE TABLE_NAME = ‘TEST’ AND COLUMN_NAME = ‘TEST_DATE’)
BEGIN
   ALTER TABLE TEST ADD TEST_DATE DATETIME
END

Since we have taken away all the necessary code, only a direct query is needed in this case.

Summary

Which method would you prefer in this case? Why? Any better method than the one present above? I bet these two are the best we have for checking up a field existence unless you are talking about other languages than PHP. I would love to know your thoughts 🙂

Tutorial: How to change plugin table structure in WordPress

Some of us will have problem updating or changing your table structure in your WordPress plugin after it has been released to the public. Many people will come up with different ideas to change their existing plugin structure to a new one. Idea such as checking for that particular column existence either through pure SQL or mixture of SQL and PHP. However, the approach here may be a bit overkill. There is a much simpler way.

Mistakes Made By WordPress Developers

In most plugin tutorial on Google, we will see the normal declaration that everyone is familiar.

$table = $wpdb->prefix."hungred_post_thumbnail";
$structure = "CREATE TABLE  `".$table."` (
	hpt_post varchar(255) NOT NULL,
	hpt_name longtext NOT NULL,
	hpt_url longtext NOT NULL,
	hpt_loc longtext NOT NULL,
	UNIQUE KEY id (hpt_post)
);";
$wpdb->query($structure);

This is the usual code instruction during a plugin tutorial. However, the problem with this is that it makes maintenance of plugin difficult. Assuming you are trying to update the table structure with the above statement. You will find difficulty and resort to different means of getting your plugin table structure updated while keeping the same declaration in WordPress. This is not the right way to create a WordPress table!

Powerful way of creating plugin table in WordPress

We need something more powerful to take the job. In WordPress, there is a function dbDelta which will compare the structure between the existing table and the one in the WordPress database. It will automatic update the missing or extra field and alter the table for you. However, this method doesn't exist in WordPress default setup. You will have to import update.php to get this function. Furthermore, dbDelta will required a few criteria to be met before it is usable.

  • You have to put each field on its own line in your SQL statement.
  • You have to have two spaces between the words PRIMARY KEY and the definition of your primary key.
  • You must use the key word KEY rather than its synonym INDEX

Hence, you will have the following declaration.

$table = $wpdb->prefix."hungred_post_thumbnail";
$structure = "CREATE TABLE `".$table."` (
	hpt_post varchar(255) NOT NULL,
	hpt_name longtext NOT NULL,
	hpt_url longtext NOT NULL,
	hpt_loc longtext NOT NULL,
	UNIQUE KEY id (hpt_post)
);";
require_once(ABSPATH . 'wp-admin/includes/upgrade.php');
dbDelta($structure);

Just that simple. Once you utilized this, changing the structure of your WordPress plugin table will be an ease.

WordPress Plugin: Hungred Image Fit

This plugin is something i build a few months ago but just published out to the public and share with you. This plugin basically do nothing unless there is a need to. Therefore, maintain the current efficiency rate of the website. This plugin helps you guys with large image that are so big when placed on your post that it went over shot your existing layout design. This is not desirable. Hence, a simple plugin is made to solve this problem (again this is a plugin for lazy or precautions people). I implement this plugin on Hungred.com and 1sitedaily.com.

Description

This is a very small and lightweight plugin that automatically adjust your images on your post with a maximum width. This is to eliminate the problem where your images are too large and overlap other parts of your website layout.
Any image that are greater than the maximum width is being adjust according to its ratio aspect. Those images that are smaller than the maximum width is being ignored
On the other hand, resized images also have its tag enhanced to have 'title' and 'alt' attributes for better SEO.

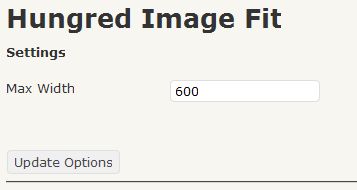
A control panel for adjusting the maximum width size is provided.

For version 0.7 onwards, there is a few new features.

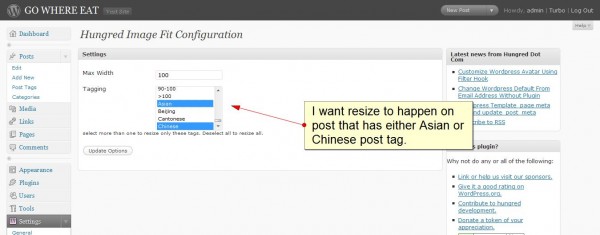
  1. User now can resize post images with specific tag
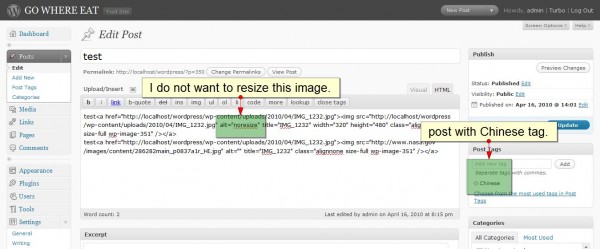
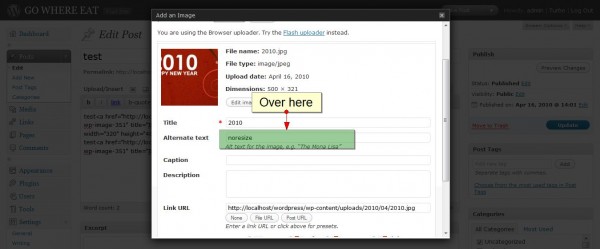
  2. User can remove resize capability of a particular post by placing "noresize" on the alt attribute of the img tag
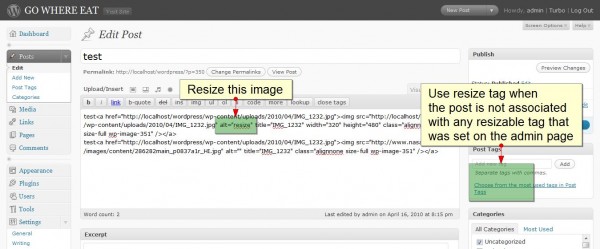
  3. User can resize a particular post by placing "resize" on the alt attribute of the img tag for user to have absolute control over resizing of image.
  4. Resize method has changed to an optimum one where resizing will not delay your website due to the waiting time for image detail using PHP getimagesize function.

Screen shot of the plugin

Here are the control panel of Hungred Image fit. Simple and clear.

hungred-image-fit

How to use this plugin

This plugin is a straight forward type of plugin. Do the following and you can ignore it for the rest of your life!

  1. Install it into your wordpress site
  2. Activate Hungred Image Fit
  3. On setting, go to the control panel of Hungred Image Fit and set the maximum width
  4. DONE!

That's it!

On version 0.7, there are more control over the resizing plugin. Here are some information.

  1. You can now resize post that associate with a particular tag. This is done on the admin page.
  2. You can manually disable resizing on certain image by placing "noresize" on the img tag alt attribute
  3. You can manually enable resizing for a particular tag that is not associate with any allowed tag by placing "resize" on the img tag alt attribute.
  4. You can place the key "resize" or "noresize" by using wordpress uploader too.

Plugin

You can search for this plugin on WordPress repository by typing 'hungred' as search criteria. If you want to manually install this, the link is here

Example

I guess its really hard to tell what does this plugin do. Since i used this on 1sitedaily.com, i will show you their example.

hungred-image-fit-example

hungred-image-fit-example-2