Setup LXC and Nat on Proxmox

The latest Proxmox 4.0 no longer support OpenVZ and we are met with LXC, Linux Container, which is kinda the next thing. But how do we setup a NAT on a LXC? Is it different from the original OpenVZ. Well, its kinda the same. But i will cut the bullshit here and goes straight to the objective. Here, we will try to create a LXC container in Proxmox and allow the same public ip to connect to the LXC container, in and out.

Installing LXC Container on Proxmox

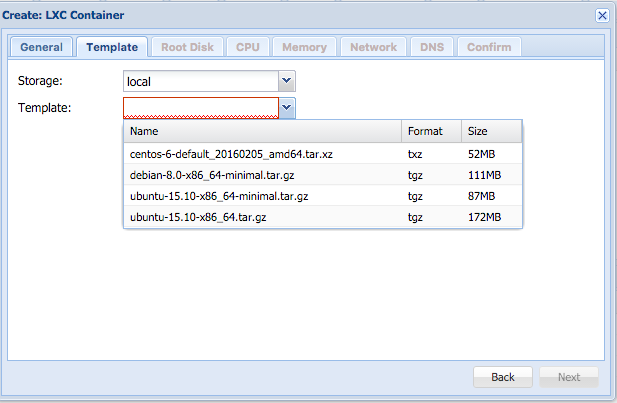
First let's setup a container, let's create a Ubuntu container by selecting the template.

Screen Shot 2016-03-13 at 4.11.51 AM

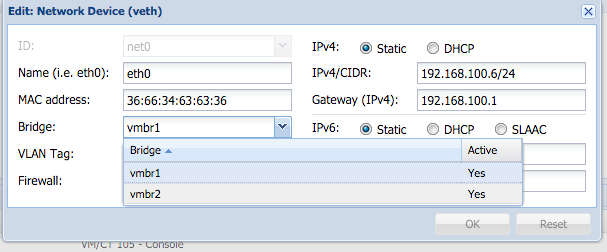
Once we selected, let's setup the network area, take note that i have the internet bridge of vmbr1 (which will need to be change later). Do take note that /24 meaning your submask is 255.255.255.0 and the Gateway should really be what you have set on your vmbr1 (which is also your bridge network to all your NAT container). In this case, mine is 192.168.100.1
Screen Shot 2016-03-13 at 4.12.33 AM

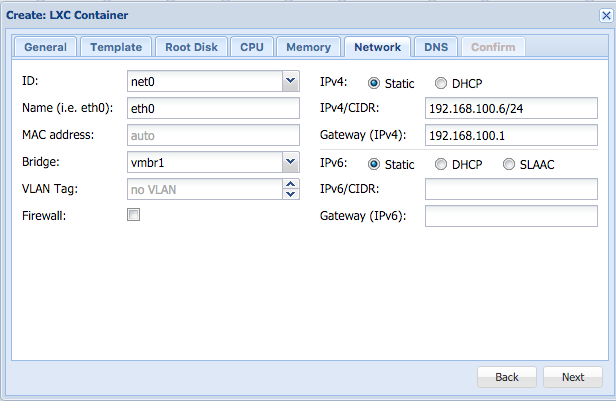
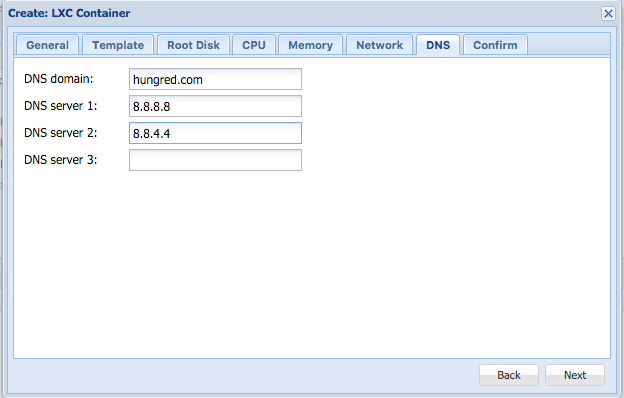
I am giving my LXC container the local ip of 192.168.100.6, just ignore the /24 for now. And setup the DNS

Screen Shot 2016-03-13 at 4.16.01 AM

And we are all done, now starts the machine and we are ready to go!

Setup NAT on Proxmox

Now this is the important part, we have 2 things to do, the first setup a new network on /etc/network/interface as show below,

auto vmbr2
#private sub network
iface vmbr2 inet static
        address  192.168.100.1
        netmask  255.255.255.0
        bridge_ports none
        bridge_stp off
        bridge_fd 0

        post-up echo 1 > /proc/sys/net/ipv4/ip_forward
        post-up   iptables -t nat -A POSTROUTING -s '192.168.100.0/24' -o vmbr1 -j MASQUERADE
        post-down iptables -t nat -D POSTROUTING -s '192.168.100.0/24' -o vmbr1 -j MASQUERADE

Do take note that i have added the above so that my container will have internet for all ip within the range of 192.168.100.0/24 (1-255). Now restart the network

/etc/init.d/networking restart

after restarting update the LXC container to use vmbr2.
Screen Shot 2016-03-13 at 4.20.57 AM
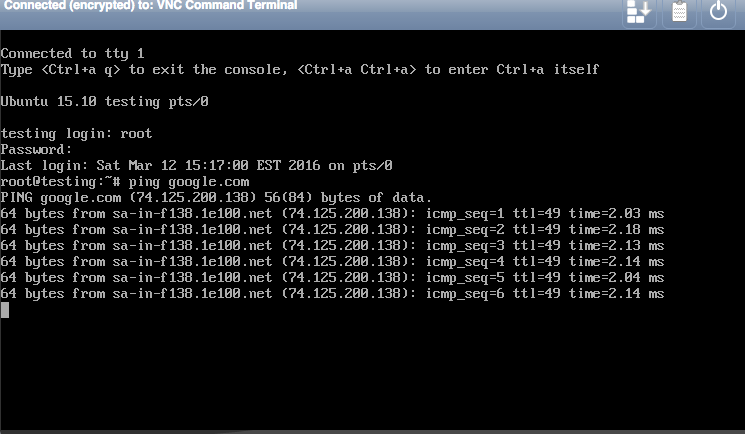
Now access your LXC container via NoVNC (Chrome or Firefox) and you should be able to connect to the internet!
Screen Shot 2016-03-13 at 4.23.04 AM

Allow outside connect to LXC

Although you have internet, you will notice that you are not allow to connect to your LXC machine, this is because you did not allow outside to connect to your LXC container. In order to do that, you will need to add stuff into your iptables, add these to your host machine,

#port forward port 2222 to our LXC machine port 22 so we could ssh
iptables -A PREROUTING -i vmbr1 -p tcp -m tcp --dport 2222 -j DNAT --to-destination 192.168.100.6:22
#we did the below just now on network interface config
iptables -A POSTROUTING -s 192.168.100.0/24 -o vmbr1 -j MASQUERADE
#this allows outside to connect to your LXC machines
iptables -A POSTROUTING -s 192.168.100.0/24 -o vmbr1 -j SNAT --to-source 45.125.192.250

What we did on the vmbr2 just now is shown above, if you do not want to add that on the interface section, just do it here. Once you've done that, you should be able to ssh into your LXC container as well! All good!

Docker MariaDB + MySQL + PHP FPM + Nginx Reverse Proxy + Nginx WordPress + PhpMyAdmin Setup

Ok, im migrating this website to another server using docker. This is how i setup my multi site with Docker Nginx and MariaDB or MySQL if you wonder. Here is what i did,

Install MariaDB / MySQL

Look for MariaDB on the offical Docker hub, we are going to install the one below,

docker run --restart=always --name mariadb -v /root/mysql:/var/lib/mysql -v /root/mysql/conf.d:/etc/mysql/conf.d -e MYSQL_ROOT_PASSWORD=PassWord10 -d mariadb:latest

So all our data record are located at /root/mysql with the root password as shown above using the 'latest' tag for the latest mariadb.

Install PhpMyAdmin

Now i need to manage my MySQL externally so im going to install PhpMyAdmin using the official Docker hub image i create an image with the name phpmyadmin.

docker run --restart=always --name phpmyadmin -d --link mariadb:db -p 8080:8080 phpmyadmin/phpmyadmin

The creates a phpmyadmin that links to my mariadb container using port 8080. Hence, if you are going to visit phpmyadmin, just head over to localhost:8080

Install Nginx Reverse Proxy

As for reverse proxy im using one of the open image

docker run -d -p 80:80 -p 443:443 --restart=always --name proxy -v /root/nginx/htpasswd:/etc/nginx/htpasswd -v /root/nginx/ssl:/etc/nginx/certs  -v /var/run/docker.sock:/tmp/docker.sock:ro  jwilder/nginx-proxy

This creates a few folder on my host machine so i could manage my virtual host and open up both port 80 and 443 for SSL enabled website.

Now to generate SSL into /root/nginx/ssl i use the following

openssl req -x509 -newkey rsa:2048 -keyout default.key -out default.crt-days 9999

and our virtual host should be able to support SSL on port 443

Install PHP+FPM

So i need PHP+FPM, hence, i added the container below using the image from the offical php but with my own DockerFile but you can use mine as shown below,


docker run -it --restart=always --name phpfpm --link mariadb:mysqlip -v /root/www:/home claylua/phpfpm

well, i keep the default name of phpfpm and i keep the dockerfile in my github.

Install Nginx

Now i need to install WordPress but before that i will need a web server and im using Nginx in this case, using the official nginx image, i run a subdomain of hungred.com

docker run 
-e VIRTUAL_HOST=test.hungred.com,www.test.hungred.com
--restart=always 
--name test.hungred.com 
--link mariadb:mysqlip 
--link phpfpm:phpfpm 
-v /root/nginx/conf.d/test.hungred.com:/etc/nginx/conf.d 
-v /root/nginx/ssl/test.hungred.com:/etc/nginx/ssl
-v /root/nginx/conf/test.hungred.com/nginx.conf:/etc/nginx/nginx.conf:ro 
-v /root/www/test.hungred.com:/home/test.hungred.com:ro 
-d -p 10295:80 nginx

Take note that the port should be different and can be anything with the path to the host at your own discrete. For each path, i am trying to create a custom installation for the web server folder and nginx configuration. Hence, for each nginx configuration on your host, do add the following nginx.conf into the path you have specific above.

user  nginx;
worker_processes  1;

error_log  /var/log/nginx/error.log warn;
pid        /var/run/nginx.pid;


events {
    worker_connections  1024;
}


http {
    include       /etc/nginx/mime.types;
    default_type  application/octet-stream;

    log_format  main  '$remote_addr - $remote_user [$time_local] "$request" '
                      '$status $body_bytes_sent "$http_referer" '
                      '"$http_user_agent" "$http_x_forwarded_for"';

    access_log  /var/log/nginx/access.log  main;

    sendfile        on;
    #tcp_nopush     on;

    keepalive_timeout  65;

    #gzip  on;

    include /etc/nginx/conf.d/*.conf;
}

After this we will need to do a proxy for all php files to the phpfpm container we just created previously. head over to /root/nginx/sites-available/test.hungred.com and create a new file call default and paste the following code

server {
    listen       80;
    listen 443 ssl;
    server_name  test.hungred.com;

    root   /home/test.hungred.com/;

    location / {
        index  index.html index.htm index.php;
        try_files $uri /index.php$is_args$args;
    }

    location ~ \.php$ {
            include fastcgi_params;
            fastcgi_pass  phpfpm:9000;
            fastcgi_index index.php;
            fastcgi_param SCRIPT_FILENAME $document_root/$fastcgi_script_name;
    }
}

And since our php files is located at /var/www/test.hungred.com/ we will just place everything there for all our php request.

Test it!

Now once you are done with the above, start all your container, restart your server, and whatever you do, make sure that everything still works perfectly for you!

*** UPDATE ***

In case you are wondering where i host my website, i am currently hosting with Digital Ocean, using their 512MB node, highly recommended and very stable so far as compare to other provider i have been with. You can choose Vulr as well, which provides you higher memory and disk space with many other options to help yous ave cost.

Complete Install OpenVAS 8 in Ubuntu 14.04 using PPA

Pretty irritating to install OpenVAS 8 in Ubuntu 14.04. Just take a lot of time and effort. Here i am disclosing the full methods needed needed to get OpenVAS 8 fully working with all the deep scanning and optional plugins as well.

Required OpenVAS libraries

Before we began, make sure the following commands are available.

sudo apt-get install -y build-essential devscripts dpatch libassuan-dev \
 libglib2.0-dev libgpgme11-dev libpcre3-dev libpth-dev libwrap0-dev libgmp-dev libgmp3-dev \
 libgpgme11-dev libopenvas2 libpcre3-dev libpth-dev quilt cmake pkg-config \
 libssh-dev libglib2.0-dev libpcap-dev libgpgme11-dev uuid-dev bison libksba-dev \
 doxygen sqlfairy xmltoman sqlite3 libsqlite3-dev wamerican redis-server libhiredis-dev libsnmp-dev \
 libmicrohttpd-dev libxml2-dev libxslt1-dev xsltproc libssh2-1-dev libldap2-dev autoconf nmap libgnutls-dev \
libpopt-dev heimdal-dev heimdal-multidev libpopt-dev mingw32 

sudo apt-get install make git screen rsync sudo software-properties-common sqlite3 alien nsis rpm nmap libcurl4-gnutls-dev w3af-console python-setuptools pnscan netdiag slapd ldap-utils snmp ike-scan zip aptitude xsltproc texlive-latex-base texlive-latex-extra texlive-latex-recommended htmldoc w3af-console

Then install Ruby 2.2.3

cd
git clone git://github.com/sstephenson/rbenv.git .rbenv
echo 'export PATH="$HOME/.rbenv/bin:$PATH"' >> ~/.bashrc
echo 'eval "$(rbenv init -)"' >> ~/.bashrc
exec $SHELL

git clone git://github.com/sstephenson/ruby-build.git ~/.rbenv/plugins/ruby-build
echo 'export PATH="$HOME/.rbenv/plugins/ruby-build/bin:$PATH"' >> ~/.bashrc
exec $SHELL

git clone https://github.com/sstephenson/rbenv-gem-rehash.git ~/.rbenv/plugins/rbenv-gem-rehash

rbenv install 2.2.3
rbenv global 2.2.3
ruby -v

Adding OpenVAS 8 PPA

once the above are done try to add the PPA as below,

sudo add-apt-repository ppa:mrazavi/openvas
sudo apt-get update
sudo apt-get install openvas

Install OpenVAS 8 database

once you've installed openvas, do the following

sudo openvas-nvt-sync
sudo openvas-scapdata-sync
sudo openvas-certdata-sync

sudo service openvas-scanner restart
sudo service openvas-manager restart
sudo openvasmd --rebuild --progress

Install OpenVAS 8 PDF Support

Once you do that remember to install the following to enable pdf report

apt-get install texlive-full
(this is not optimal thou, this installs a bunch of packets..)

Check OpenVAS 8 Setup

And make sure that everything is ok

wget https://svn.wald.intevation.org/svn/openvas/trunk/tools/openvas-check-setup --no-check-certificate
 chmod 0755 openvas-check-setup
 ./openvas-check-setup --v8 --server

Plugins Executable

Now, let's try to make all OpenVAS 8 plugins executable

chmod +x /usr/lib/openvas/plugins/*

This is optional though.

Adding OpenVAS 8 Deep scan Support

And for deep scan, you might want to manually install these as well,

Adding DIRB:

http://prithak.blogspot.se/2011/08/brute-force-directory-and-files-on-web.html
apt-get install libcurl4-gnutls-dev
wget -c 'http://sourceforge.net/projects/dirb/files/dirb/2.22/dirb222.tar.gz/download' -O dirb222.tar.gz
tar -zxvf dirb222.tar.gz
cd dirb
./configure
make
make install
Test installation:
/usr/local/bin/dirb
ln -s /usr/local/bin/dirb /usr/bin/

Adding nikto:

wget https://github.com/sullo/nikto/archive/master.zip
unzip master.zip
cd nikto-master/programs
cp * /usr/local/bin/
ln -s /usr/local/bin/nikto.pl /usr/bin/

Add wapiti:

sudo apt-get install python-setuptools
wget -O wapiti-2.3.0.tar.gz "http://downloads.sourceforge.net/project/wapiti/wapiti/wapiti-2.3.0/wapiti-2.3.0.tar.gz?r=http://sourceforge.net/projects/wapiti/files/wapiti/wapiti-2.3.0/&ts=1391931386&use_mirror=heanet"
tar zxvf wapiti-2.3.0.tar.gz
cd wapiti-2.3.0
python setup.py install
ln -s /usr/local/bin/wapiti /usr/bin/

Add arachni:

gem install arachni
ln -s /var/lib/gems/1.9.1/bin/arachni* /usr/bin
export PATH="${PATH}:/usr/local/sbin:/usr/local/bin:/usr/sbin:/usr/bin:/sbin:/bin:/usr/bin/X11:/var/lib/gems/1.9.1/bin"

Others Options plugins are install via apt-get on the requirement page.

Please take note the above process is pretty long. Hence, do use screen for all your installation session. Once you've done that, you can login into https://ip:443 with "admin" as username and password.

Useful Links

Here are some links that assist with the above OpenVAS 8 installation.

OpenVAS 8 503 – Service temporarily down

Ok, this is a nightmare, when you found out you did something unknown and break your OpenVAS and every time you tries to start a task, you get a 503 - Service temporarily down message. And whatever you do, its not recovering. Most likely you would go reinstall the whole OpenVAS 8. The real issue is that it takes too long to get everything setup, especially if you want EVERYTHING to be ready and good to go. I know, i have been there.

503 - Service temporarily down

The issue started when i trying to figure out why scan result isn't working for me. I accidentally updated the cert and everything just go down hill from there. Hence, the only way is to figure out what happen. And the following solution seems to work for me.

openvas-mkcert-client -n om -i
openvas-nvt-sync --wget
/etc/init.d/openvas-scanner stop; /etc/init.d/openvas-manager stop;
openvassd
rm /var/lib/openvas/mgr/tasks.db
openvasmd --progress --rebuild -v

What this does is to remove ALL your task. And rebuild it again. It seems that somehow when we refresh the cert, all the task that bind with the old cert can't seems to perform a handshake with the new cert that i have generated. Hence, removing everything and redo it again seems to solve this problem.

**** UPDATES 20/12/2015 ****
Apparently, Michael Meyer saw this article and somehow added and correctly provided alternative as show below,

"Updating Scanner Certificates

If you have changed the CA certificate used to sign the server and client
certificates or the client certificate itself you will need to update the
certificates in Manager database as well.

The database can be updated using the following command:

$ openvasmd --modify-scanner <uuid> \
--scanner-ca-pub <cacert> \
--scanner-key-pub <clientcert> \
--scanner-key-priv <clientkey>

Where:
<uuid> refers to the UUID used by OpenVAS Manager to identify the scanner; the UUID can be retrieved with "openvasmd --get-scanners"
<cacert> refers to the certificate of the CA used to sign the scanner certificate
<clientcert> refers to the certificate Manager uses to authenticate when connecting to the scanner
<clientkey> refers to the private key Manager uses to authenticate when connecting to the scanner"

For more information and other options do go to https://wald.intevation.org/svn/openvas/trunk/openvas-manager/INSTALL where you would find more options and may be helps to resolve your issue.

All credits goes to Michael Meyer and thanks for the update!

Gitlab 500/502 Error After Upgrade

Here is what happen, i got either a 500 or 502 error after an upgrade using Omnibus method. And got the error message "Gitlab is not responding"

40TPT

The first thing i did was to look for what could have happen. And the first place to see that is on the log file located at

/var/log/gitlab/gitlab-rails/production.log

And the log basically just give me an error as shown below,

Started GET "/users/sign_in" for 175.144.6.68 at 2015-12-12 23:48:54 +0800
Processing by SessionsController#new as HTML
Completed 500 Internal Server Error in 98ms (ActiveRecord: 10.8ms)

NoMethodError (undefined method `push_events=' for #<GitlabCiService:0x0000000463dba8>):
  app/models/project.rb:809:in `builds_enabled='
  app/controllers/application_controller.rb:194:in `add_gon_variables'

But when i do a status check, it gives me this

[root@git gitlab-rails]# gitlab-ctl status
run: gitlab-workhorse: (pid 4934) 1009s; run: log: (pid 4147) 1227s
run: logrotate: (pid 4942) 1008s; run: log: (pid 296) 3434s
run: nginx: (pid 4948) 1008s; run: log: (pid 299) 3434s
run: postgresql: (pid 4957) 1007s; run: log: (pid 301) 3434s
run: redis: (pid 4965) 1007s; run: log: (pid 294) 3434s
run: sidekiq: (pid 4972) 1005s; run: log: (pid 302) 3434s
run: unicorn: (pid 4990) 1004s; run: log: (pid 305) 3434s

I have pretty much no idea what is going on. But after trying out different ways, it seems to boil down to the following,

1. Check what is going on

Firing the following command should give you an idea what is going on with your configure.

sudo gitlab-rake gitlab:check

After that you could try see what is causing it.

2. Forget to turn on postgres before upgrade

Well, because gitlab said to shutdown gitlab before upgrading, hence i did this,

gitlab-ctl stop

which stops everything including postgres. Hence, database migration wasn't possible. Therefore, i fire the following command and see whether that helps

gitlab-rake db:migrate

Now, after this i still got a 502 error but at least i'm not stuck with 500 error!

3. Forget to reconfigure after an upgrade

Well, if its not database migration, then every time you did a migration, remember to do a reconfigure!

gitlab-ctl reconfigure

Once i did this. Wait a while, and puff! The screen is back up!

Screen Shot 2015-12-13 at 12.00.47 AM

I'm just grateful everything is ok! Just remember to back up your VM image before doing all these upgrades!